Q) What is the startup class in ASP.NET core?
A) Startup class is the entry point of the ASP.NET Core application. This class contains the application configuration related items. It is not necessary that class name must "Startup", it can be anything, we can configure startup class in Program class.
Startup Class:- Constructor:
- Typically accepts an
IConfigurationinstance, allowing access to application settings from sources likeappsettings.json.
- Typically accepts an
ConfigureServicesMethod:- This method is called by the runtime to add services to the dependency injection (DI) container.
- It accepts an
IServiceCollectionparameter, where you register services (e.g., database contexts, authentication services, MVC/Razor Pages services) that your application will use.
ConfigureMethod:- This method is called by the runtime to configure the application's HTTP request pipeline using middleware.
- It accepts
IApplicationBuilderandIWebHostEnvironment(orIHostEnvironment) parameters. - You define the order of middleware components (e.g., routing, authentication, authorization, static files, error handling) in this method.
- This method is called by the runtime to configure the application's HTTP request pipeline using middleware.
Program.cs:Program.cs structure, the Startup class is specified during host building:-----------------------------------------------------------------------------------------------------------------------------
Q) What is the use of Configure Services method of startup class?
A) This is an optional method of startup class. It can be used to configure the services that are used by the application. This method calls first when the application is requested for the first time. Using this method, we can add the services to the DI container, so services are available as a dependency in controller constructor.
(or)
A) It defines how the application will respond to each HTTP request. We can configure the request pipeline by configuring the middleware. It accepts IApplicationBuilder as a parameter and also it has two optional parameters: IHostingEnvironment and ILoggerFactory. Using this method, we can configure built-in middleware such as routing, authentication, session, etc. as well as third-party middleware.
-----------------------------------------------------------------------------------------------------------------------------
Q) What is middleware?
Middleware in ASP.NET Core refers to software components that are assembled into an application pipeline to handle requests and responses. Each middleware component can choose whether to pass the request to the next component in the pipeline and can perform work before and after the next component.
Key characteristics and functions of ASP.NET Core Middleware:
Request/Response Handling: Middleware components are designed to process incoming HTTP requests and outgoing HTTP responses. They form a chain, where each component can inspect, modify, or even short-circuit the request/response flow.
- Middleware components are executed in a specific order, forming a pipeline. The order in which they are added to the pipeline is crucial, as it determines the sequence of operations.
- .NET Core provides many built-in middleware components for common tasks (e.g., authentication, routing, static file serving, exception handling). Developers can also create custom middleware to implement specific application logic.
- Middleware components are configured in the
Configuremethod of the application'sStartupclass (or directly withinProgram.csin newer .NET versions) using methods likeUse,Run, andMapon theIApplicationBuilderinterface.
app.Use()
app.useis used to register middleware components in the application's request pipeline.
- Middleware registered with
app.usecan perform actions on the incoming request and/or outgoing response, and then optionally pass the request to the next middleware in the pipeline using anextdelegate or function. - This allows for a chain of responsibility where multiple middleware components can process a request sequentially.
- Examples include logging middleware, authentication middleware, error handling middleware, or static file serving middleware.
Example:
Code
app.Use(async (context, next) =>
{
// Do something before the next middleware
await next.Invoke(); // Call the next middleware
// Do something after the next middleware
});
app.Run()
Purpose: app.Run() adds a middleware component that terminates the request pipeline. It generates a response and prevents any subsequent middleware components from executing.
- Once
app.runis executed, no subsequent middleware in the pipeline will be invoked for that request. - It is typically used to define the final action for a specific route or to provide a default response if no other middleware has handled the request.
Example:
Code
app.Run(async context =>
{
await context.Response.WriteAsync("Hello from app.Run!"); // Terminate the pipeline with this response
});
In summary:

app.Map: This method creates a branch in the middleware pipeline based on a matching request path. It allows you to define a separate, isolated middleware pipeline that only executes for requests whose paths match a specified prefix.(OR)
UseDeveloperExceptionPage: Catches exceptions and displays detailed error information during development.UseHttpsRedirection: Redirects HTTP requests to HTTPS.UseStaticFiles: Serves static files like CSS, JavaScript, and images.UseRouting: Matches incoming requests to defined routes.UseAuthenticationandUseAuthorization: Handle user authentication and authorization.
-----------------------------------------------------------------------------------------------------------------------------
Q) What is routing in ASP.NET Core?
A) Routing is functionality that map incoming request to the route handler. The route can have values (extract them from URL) that used to process the request. Using the route, routing can find route handler based on URL. All the routes are registered when the application is started. There are two types of routing supported by ASP.NET Core
The conventional routing
Attribute routing
The Routing uses routes for map incoming request with route handler and Generate URL that used in response. Mostly, the application having a single collection of routes and this collection are used for the process the request. The RouteAsync method is used to map incoming request (that match the URL) with available in route collection.
-----------------------------------------------------------------------------------------------------------------------------
Q) How to enable Session in ASP.NET Core?
A) The middleware for the session is provided by the package Microsoft.AspNetCore.Session. To use the session in ASP.NET Core application, we need to add this package to csproj file and add the Session middleware to ASP.NET Core request pipeline.
public class Startup
{
public void ConfigureServices(IServiceCollection services)
{
….
….
services.AddSession();
services.AddMvc();
}
public void Configure (IApplicationBuilder app, IHostingEnvironment env)
{
….
….
app.UseSession();
….
….
}
}
-----------------------------------------------------------------------------------------------------------------------------
Q) What are the various JSON files available in ASP.NET Core?
There are following JSON files in ASP.NET Core:
global. Json
launchsettings.json
appsettings.json
bundleconfig.json
bower. Json
package. Json
-----------------------------------------------------------------------------------------------------------------------------
How do you Register Services in ASP.NET Core?
Services are registered using the ConfigureServices method of the Startup class in ASP.NET Core. You use the provided IServiceCollection to add services to the application. There are several methods for registering services, including AddSingleton, AddScoped, and AddTransient, depending on the desired lifetime of the service instances.
Explain the differences between transient, scoped, and singleton services.
- Transient: A new instance is created every time the service is requested.
- Scoped: A new instance is created once per client request (e.g., per HTTP request in a web application).
- Singleton: A single instance is created the first time it's requested and reused throughout the application's lifetime.

-----------------------------------------------------------------------------------------------------------------------------
Q) What is XSRF or CSRF? How to prevent Cross-Site Request Forgery (XSRF/CSRF) attacks in ASP.NET Core?
A) Cross-Site Request Forgery (XSRF/CSRF) is an attack where attacker that acts as a trusted source send some data to a website and perform some action. An attacker is considered a trusted source because it uses the authenticated cookie information stored in browser.For example a user visits some site 'www.abc.com' then browser performs authentication successfully and stores the user information in cookie and perform some actions, In between user visits some other malicious site 'www.bad-user.com' and this site contains some code to make a request to vulnerable site (www.abc.com). It's called cross site part of CSRF.
-----------------------------------------------------------------------------------------------------------------------------
Q) How to prevent CSRF?
A) In ASP.NET Core 2.0 or later FormTaghelper automatically inject the antiforgery tokens into HTML form element.You can add manually antiforgery token in HTML forms by using @Html.AntiForgeryToken() and then you can validate it in controller by ValidateAntiForgeryToken() method.
-----------------------------------------------------------------------------------------------------------------------------
---------------------------------------------------------------------------------------------------------------------
FAQ:
Short notes:
DI Container (Service Container):
In .NET Core, this is a built-in system (implemented by IServiceProvider and configured via IServiceCollection) that manages the lifecycle of services and provides instances of dependencies when requested.
Injection:
The process of providing a required dependency from the DI container to a class. Common methods include:
Constructor Injection: Dependencies are passed as arguments to the class's constructor. This is the most common and recommended approach.
Property Injection: Dependencies are assigned to public properties of the class.
Method Injection: Dependencies are passed as arguments to a specific method of the class.
Register Services:
In your application's Startup.cs (or Program.cs in newer versions), you register your services with the DI container using methods like services.AddTransient, services.AddScoped, or services.AddSingleton. These methods also define the lifetime of the service:
Transient: A new instance is created every time the service is requested.
Scoped: A new instance is created once per client request (e.g., per HTTP request in a web application).
Singleton: A single instance is created the first time it's requested and reused throughout the application's lifetime.
-----------------------------------------------------------------------------------------------------------------
Introduction
In this article, we are going to discuss Custom Middleware. This is a second article on middleware. I recommend reading the first article here before continuing on this.
This article can be used by beginners, intermediates, and professionals.
We are going to cover,
- How to create custom Middleware?
- How to use custom middleware in the HTTP pipeline?
Let’s start with custom Middleware,
How to create custom Middleware?
Asp.net core provided many in-build Middleware but in some scenarios, we need our own middleware to fulfill our requirement, in such case will go with custom middleware.
In the first article, we have written inline middleware but in the real world, we will create a separate class for middleware that is called custom middleware.
There are 2 ways to create Custom Middleware in Asp.net Core.
- Using IMiddleware interface
- Using the extension method.
Let’s try to learn how to create custom middleware using IMiddelware Interface the below example,
Step 1
Create a class and name it “CustomeMiddlewareDemo”
Step 2
Inherit “IMiddleware” interface from “Microsoft.AspNetCore.Http” namespace and implement it as per the below code.
Step 3
Now we will add code for Custom middleware in the “InvokeAsync” method.
You might notice that I have added async and await for “InvokeAsync” Method.
We have created a separate file for Custom Middleware and now we will learn how to use it.
How to use Middleware in the HTTP Pipeline?
We will consume newly created custom middleware in the HHTP pipeline.
As we know if want to use any kind of new services in the ASP.Net Core application then before we use we need to register startup.cs -> “ConfigureServices” method.
Before we use Custom middleware in the code, we will register in the “Configure Service” method.
Step 4
Configure CustomMiddleware in the “ConfigureService” Method.
Step 5
Now we will use CustomMiddleware in the HTTP Pipeline. For that, we will inject custom Middleware in the “Configure” method like below.
OUTPUT

Now we will create custom middleware using the extension method,
Step 1 - Add a new Middleware class to the project
Right Click on Project -> Add -> new item -> Asp.net Core -> Middleware class
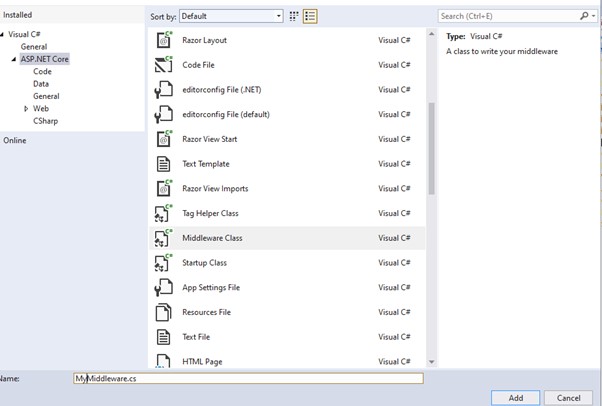
Click on Add button and observed Middleware class code.
Step 2
Add your custom code in the “Invoke” method of the Middleware class.
Step 3
Use Custom Middleware in the HTTP pipeline.
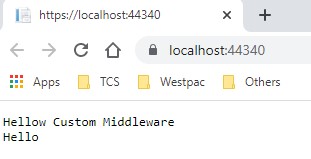
OUTPUT
That’s all for this article. Hope you enjoyed and learn how to create and configure Custom Middleware in the HTTP Pipeline.


No comments:
Post a Comment